What command is used to set the baudrate in the U-Boot bootloader?
- Introduction
- Utilize the Debug UART (Serial Console)
- Console Serial Parameters
- Windows - Detect the Number of the COM Port
- Linux - Find the Number of the ttyUSB Port
- Linux - Add User to Dialout Group
- Hardware
- Setting upwardly a final
- Observe my Board IP
- Console Serial Parameters
- Modify the Debug UART (Serial Console) to Another Port
- Disable the Debug UART (Serial Console)
- Disable U-Boot Console Output on UARTA
- Custom U-Boot
- Disable most Log Messages from Linux Kernel
- Disable Linux Kernel Console Output on UARTA
- Configure Baudrate for Serial Getty on UARTA
- Disable Serial Getty on UARTA
- Disable U-Boot Console Output on UARTA
- Video - Using the serial console with Toradex Calculator Modules
Article updated at 29 Oct 2021
Subscribe for this article updates
Introduction
On our Toradex modules, the U-Boot kicking loader and the Linux kernel utilise UART_A as series debug panel. The serial panel is the primary and nearly reliable interface to the boot loader and Linux kernel. This article has 2 main sections:
- How to apply (attach to and communicate via) the debug UART, a.g.a serial panel.
- How to disable the debug UART.
If y'all are looking for instructions on how to communicate with other devices using the UART, delight refer to the article UART (Linux).
Warning: Nosotros practise not recommend to use UART_A for any other purpose. Disabling it prevents analyzing errors (e.k. crash of the user interface) or analyzing if the system is in a non-bootable state.
Tip: This article shows how to disable the debug messages on the serial console only. In case you would like to disable debug messages or the virtual console on graphical output (DVI-I, HDMI, LVDS, or VGA) please refer to the Framebuffer (Linux) commodity.
Utilize the Debug UART (Serial Console)
You can easily access your Toradex SoM via the serial, in this department, you volition discover out how to set upwards the hardware on each of our boards as well every bit know the parameters. This section applies to both our BSP Layers and Reference Images for Yocto Project and TorizonCore.
Console Serial Parameters
Connecting to the lath requires some parameters, here they are:
- port: it depends on your hardware, often information technology is
/dev/ttyUSBxon Linux, orCOMxon Windows, beingxa number to be adamant in the side by side department. - Baud Charge per unit:
115200 - Parity:
none - $.25:
eight - Stopbits:
1 - Flow control:
none
Windows - Find the Number of the COM Port
Get to Command Console and notice the Device Manager. Your COMx port volition exist listed nether Ports.
-
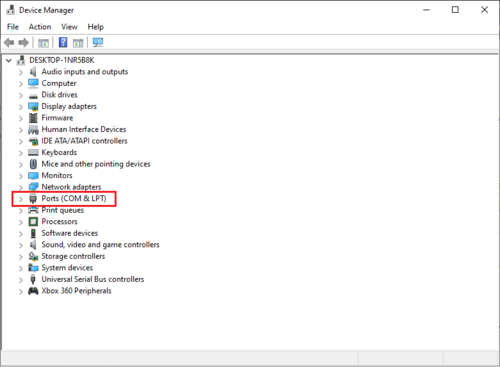
Windows device manager
Linux - Find the Number of the ttyUSB Port
Unplug the device from your computer and run:
$ ls /dev/ttyUSB* Plug the device and run the same command again, your device will be listed:
$ ls /dev/ttyUSB* Linux - Add User to Dialout Group
To avoid being requested to apply sudo all the time, you can add your user to the dialout grouping. You lot can find your user name with the whoami command. To practice information technology in a single-line, in your development PC, run:
$ sudo usermod -a -G dialout $(whoami) To apply the changes, either reboot or log-off, and log-in.
Hardware
Select your carrier board from the tabs beneath:
Connect a USB C to USB Type-A cable to X66.
-

Serial Setup for Verdin Development Board
Note: Notice that the USB C connector (X66) has an integrated USB-series converter that provides access to the reckoner on module debug serial port.
Verdin has an integrated Serial-to-USB converter that lists 4 serial ports on your reckoner. The highest index is the Linux series panel. Example, if you run into /dev/ttyUSB0, /dev/ttyUSB1, /dev/ttyUSB2 and /dev/ttyUSB3 listed, then /dev/ttyUSB3 is the series console. The aforementioned logic applies to Windows COM ports.
Attention: If yous connect to the commencement or the 2nd port (for example /dev/ttyUSB0 or /dev/ttyUSB1), y'all will non be able to employ the board. This happens considering those ports are dedicated to power/reset control and FTDI JTAG. Just close those connections and reset the board.
Connect a USB C to USB Type-A cable to DEBUG.
-

Serial setup for Dahlia Carrier Board
Note: Notice that the USB C connector (DEBUG) has an integrated USB-serial converter that provides access to the computer on module debug series port.
Verdin has an integrated Serial-to-USB converter that lists four serial ports on your computer. The highest index is the Linux serial console. Example, if you lot see /dev/ttyUSB0, /dev/ttyUSB1, /dev/ttyUSB2 and /dev/ttyUSB3 listed, and then /dev/ttyUSB3 is the serial console. The same logic applies to Windows COM ports.
Attention: If you connect to the first or the 2d port (for example /dev/ttyUSB0 or /dev/ttyUSB1), yous volition not exist able to utilize the board. This happens considering those ports are dedicated to power/reset control and FTDI JTAG. Just shut those connections and reset the board.
Connect the DB9 to the IDC adapter cable to the X22 connector on the Ixora:
-
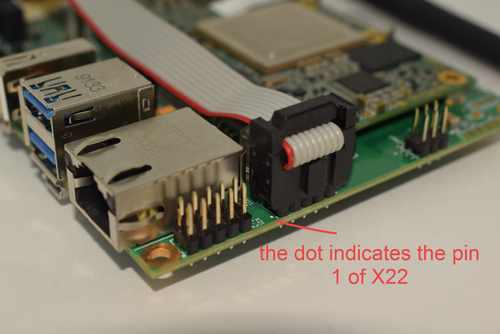
IDC header continued to the Ixora Carrier Board
Annotation: The adapter is included in the Toradex Cable Kit, the standard we used is normally called DTK or Intel standard.
Connect your host machine to the adapter cable using a serial cable or Serial to USB converter:
-
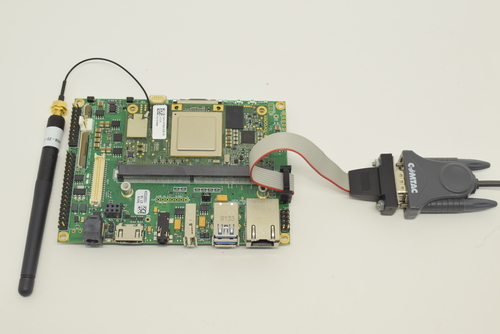
Serial setup for Ixora Carrier Board
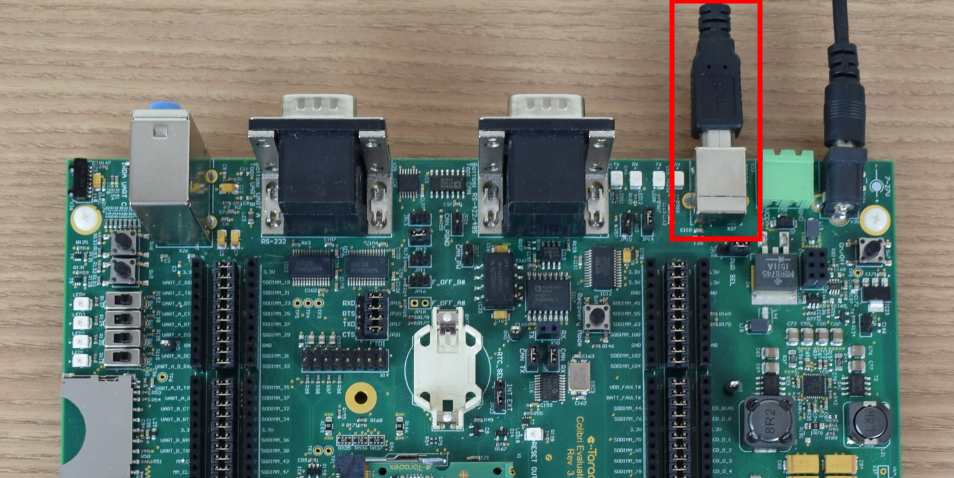
Apply UART-1 via the USB Type-B connector X29:
-
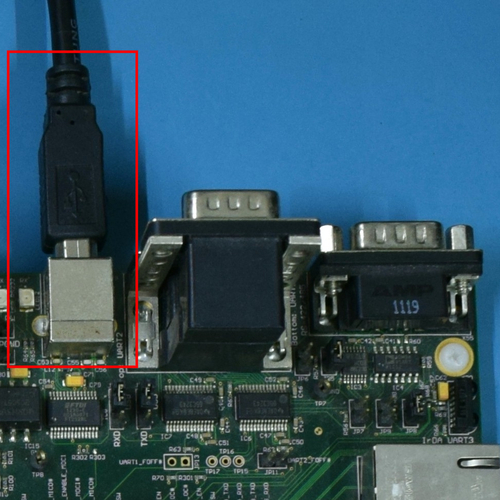
Using UART via USB X27
Make certain that the jumpers JP10 and JP12 are set up to USB mode every bit shown in the epitome below:
-
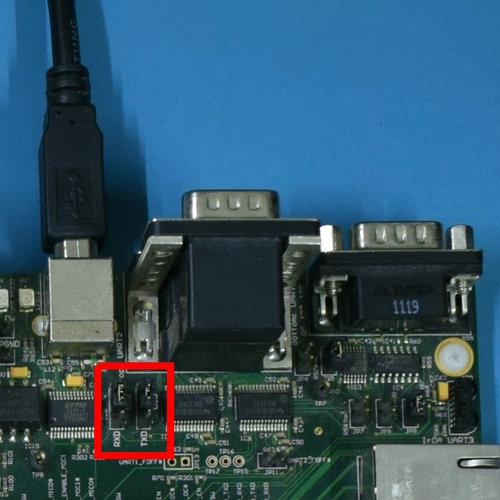
Jumpers JP10 and JP12 - USB mode
Connect the DB9 to the IDC adapter cable to the X13 connector on the Iris:
-
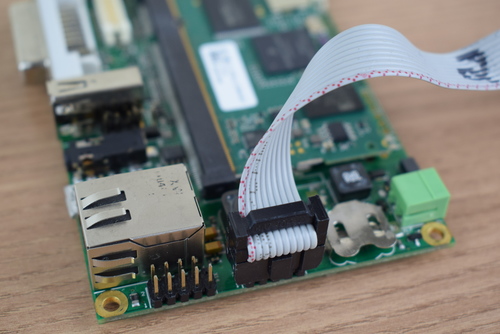
IDC header connected to the Iris Carrier Lath
Note: The adapter is included in the Toradex Cable Kit, the standard we used is unremarkably called DTK or Intel standard.
Connect your host machine to the adapter cablevision using a serial cable or Serial to USB converter:
-
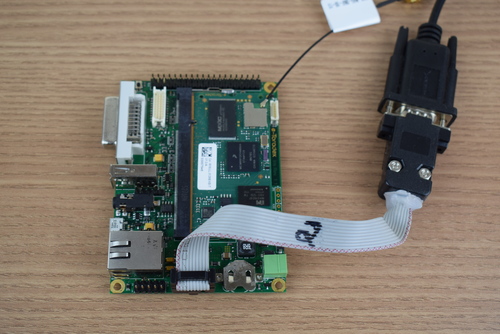
Serial setup for the Iris Carrier Board
Connect a USB micro-B to USB Blazon-A cablevision to X4.
-
Serial setup for Aster Carrier Board
Notation: Notice that the micro USB connector (X4) can be employed as a means to power the system and also has an integrated USB-series converter that provides access to the computer on module debug serial port.
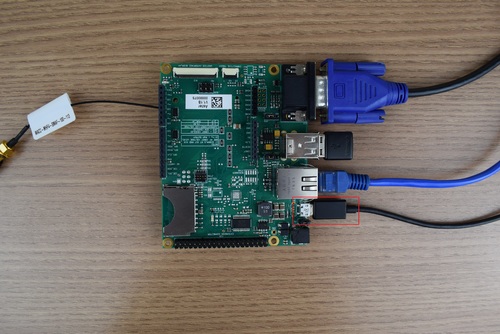
Employ UART A via the USB Type-B connector X27:
-
Using UART via USB X27
Make sure that the jumpers JP19 and JP17 are set to USB mode equally shown in the epitome below:
-

Jumpers JP17 and JP19 - USB mode
Setting up a terminal
In case you lot desire to know how to ready a concluding emulator to start accessing your module, please refer to Series Terminal Emulator article.
Find my Board IP
To go your board IP address, follow the instructions from the department Observe your IP and MAC address on the article Basic Linux Commands.
Examples of why you need your board IP:
- You are connecting to the debug UART because you lot were unable to login via SSH due to missing the lath IP.
- The DHCP tables from your LAN router were refreshed and now the board has a unlike IP address.
- You want to admission a service hosted on the board, for example, a web server or a remote graphical user interface.
Change the Debug UART (Serial Console) to Another Port
Nosotros don't provide instructions on how to do this. Nosotros advise yous to use either the default Debug Port defined by Toradex or NXP.
For the i.MX 8/8X SoMs which have a System Controller Unit/System Controller Firmware (SCU/SCFW), or other SoMs from the i.MX 8 family unit (such as the i.MX 8M Mini) which use a BootROM, information technology may be nearly or even impossible to change the default UART.
Disable the Debug UART (Serial Panel)
Here are sections for disabling the console on U-Boot and the Linux kernel. Brand sure to check on UART (Linux) the name of the UART interfaces available for your specific SoM earlier proceeding.
Disable U-Boot Panel Output on UARTA
Custom U-Boot
The following config options need to exist divers in the respective lath header file to repose letters on the series console:
CONFIG_SILENT_CONSOLE CONFIG_SYS_DEVICE_NULLDEV CONFIG_SILENT_CONSOLE_UPDATE_ON_RELOC
For enabling silent panel suspend the surround variable 'silent=1' to CONFIG_EXTRA_ENV_SETTINGS in respective lath header file.
Please refer to the post-obit article concerning setup/compilation of the same:
Build U-Kicking and Linux Kernel from Source Code
Note: Enabling silent console just bypasses the console messages to aught. Depending on the module type and U-Kick version you might still be able to interrupt U-Boot by pressing the specified key which allows you to control the U-Boot at run time.
Disable most Log Messages from Linux Kernel
To become fewer debug messages from the Linux Kernel one can utilize the "quiet" Kernel parameter.
# setenv tdxargs '${tdxargs} serenity' # saveenv Disable Linux Kernel Console Output on UARTA
Disable the console from kernel completely past setting the console= option on the kernel command line. This can be accomplished by doing it from U-Boot prompt or using U-Boot-envtools under Linux to modify the env variables:
# setenv tdxargs 'console=zero' # saveenv or using U-Boot-envtools under Linux:
# fw_setenv tdxargs 'console=null' # reboot Later on this, no kernel letters/serial login are available on debug series port anymore. To re-enable the debug serial port console one needs to reset the 'console' variable dorsum to corresponding serial tty (e.g: ttyLP0 on Colibri VFxx).
# setenv tdxargs 'console=ttyLP0' # saveenv or using U-Kicking-envtools nether Linux:
# fw_setenv tdxargs 'console=ttyLP0' # reboot Configure Baudrate for Serial Getty on UARTA
While during boot the serial baudrate is taken from the U-Kicking environment variable baudrate, the later login shell baudrate needs to exist configured separately if required in respective /etc/systemd/organisation/getty.target.wants/serial-getty@<serial device>.service file:
- i.MX vi/7: /etc/systemd/organization/getty.target.wants/serial-getty@ttymxc0.service
- Tegras: /etc/systemd/system/getty.target.wants/serial-getty@ttyS0.service
Disable Serial Getty on UARTA
Newer BSPs always showtime an explicit serial getty on UART_A which can exist disabled every bit follows:
# systemctl disable serial-getty@ttyS0.service Starting from Bsp iii.0 (Kernel four.xiv), series getty cannot be disabled anymore. Yous demand to mask it as follows:
# systemctl mask serial-getty@ttymxc0.service An interesting blog postal service from Mr. Poettering about the thematic can be establish hither.
Video - Using the serial console with Toradex Computer Modules
Source: https://developer.toradex.com/knowledge-base/how-to-disable-enable-debug-messages-in-linux
Posting Komentar untuk "What command is used to set the baudrate in the U-Boot bootloader?"